Thursday, September 24, 2009

Fall Inspiration

So I have been having a pretty hard time getting inspired to make fall-ish looking cards and such. I guess it is because things are still pretty green and warm here in the valley and I am NOT READY for fall anyway! But fall is my favorite time of year. The 21st of this month was the Autumn Equinox, which is a holiday of sorts in some cultures. It has been fun to read and learn about some of the pagan celebrations that have leaked over into modern day culture. The symbol of a cornucopia, the celebrating of leaves and trees, and feasts in honor of times of harvest. The realization that we are now headed for longer days and shorter nights - these are all inspirational to me.

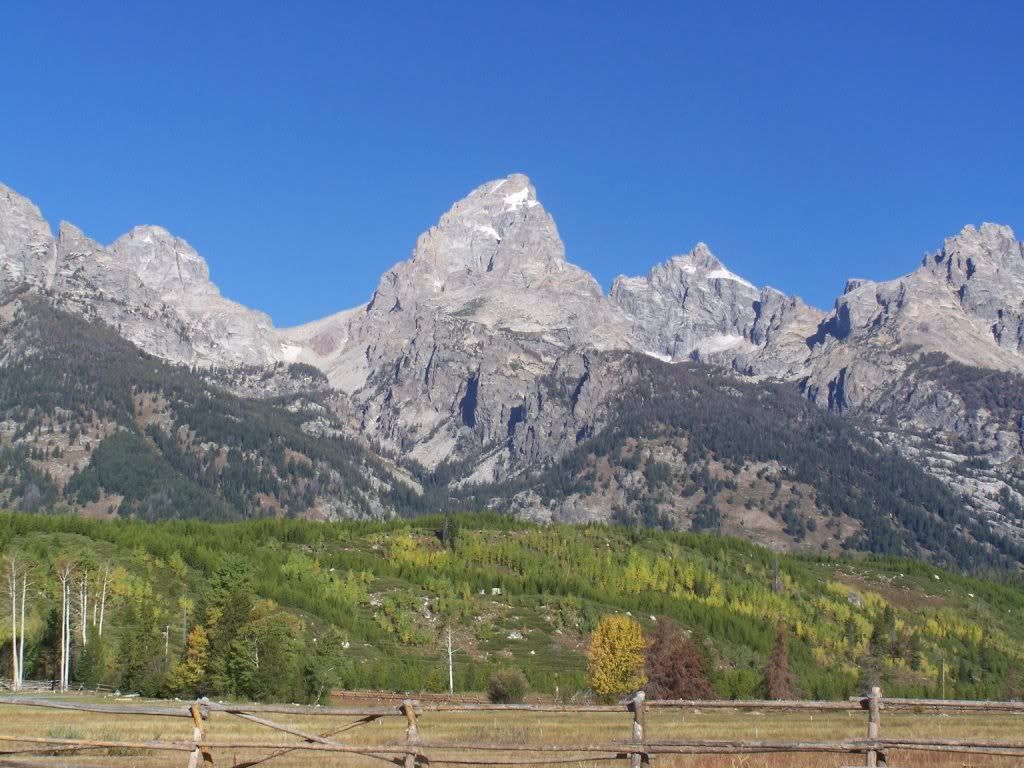
I also took a drive to Jackson and visited Grand Teton National Park yesterday, just for fun. This is one of my favorite places and somewhere that I try to go with some frequency. It's like going home - and Wednesday was a beautiful, clear day. Sometimes it is great just to road-trip it and see beautiful things and clean your soul! Who needs more inspiration than this?


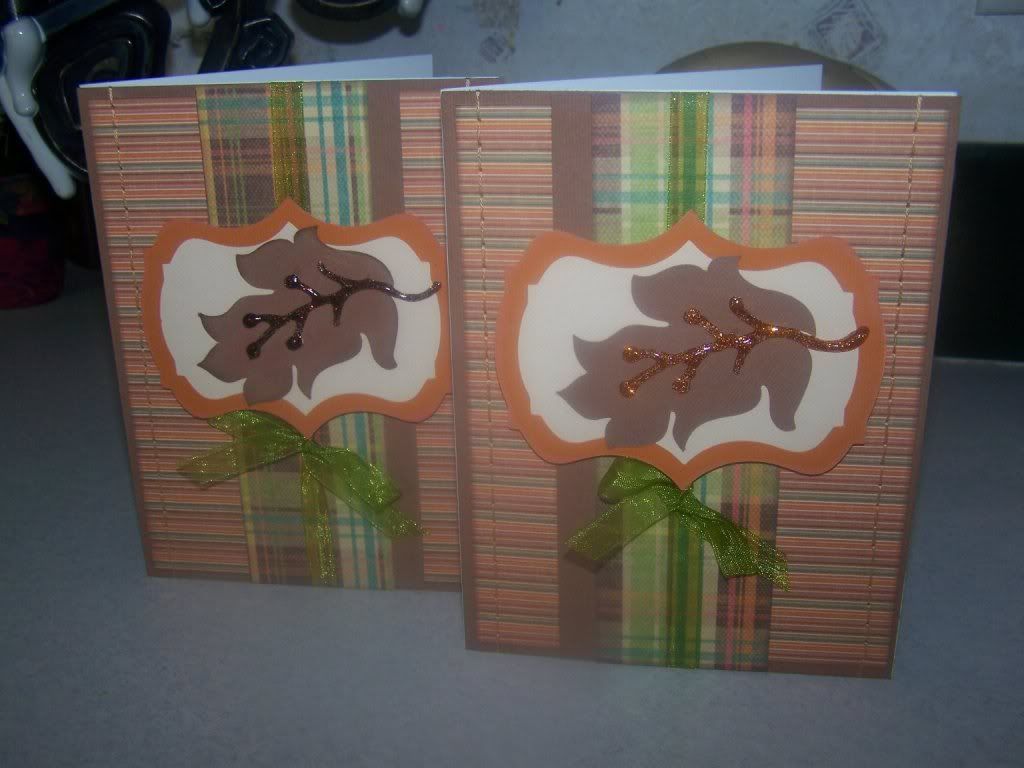
I also picked up a 12x12 DCWV stack at JoAnns this week - Indian Summer. The colors are awesome for fall and there are some really neat patters, foiled papers, and glittered papers too. I used my Storybook Cricut cartridge to make the leaves and did a little stitching and glittering too. I ended up with two large cards for the craft booth and four smaller ones for the troops. Click for a zoom to see how I used chalks to edge the patterned papers a little bit. . . I layered them and stitched everything down to the brown card base. The little marquee signs were also cut from the Storybook cartridge. I used some dimentional dots to pop the signs up, and added a green ribbon last. I love how these turned out with so much texture and color. Even though that middle stripe of patterned paper looks like some kind of golfer pants accident!!!


Finally, I was sort of at a loss for what kind of sentiment to use. I wanted something fall-ish and also something that people could use for any fall occasion. I ended up making these in Paint Shop and now I am passing them on to you. The larger sentiment fits perfectly in a 5x7ish card, and the smaller one is for those of us making the A2 size cards for the troops. Both images are .jpg formats and you can save them and print them easily onto blank card stock or paper for your cards or even for scrapbook pages! Be sure to click on them first before saving.

Happy Autumn. . . .


Monday, September 21, 2009

Card Day!

Oh, it had been too long since the ladies got together for card day!!!

The events of today were fantastic. . . it was a great time for the CDC (Card Day Club!) and we did save a few kits for those who couldn't make it this time around. And so I will post pics of todays projects for those who may need a little hand with assembly and such!!! :) We are sure hoping that with fall and the kids going back to school that the CDC will get back in full force in time for making Christmas Cards and such. Our next meeting will be Monday October 19th - hosted by me! More news to follow and of course anybody locally who would like to join us is more than welcome - it's a great time!

Today's Card Day was all about . . . bags and tags!!! WHAT??? No cards??? Well, we decided to do something different and fun, and it WAS! We are definitely going to have to do this one again. We all got to go home with all of these great gift bags. So here are pics of the loot. (click for bigger pics if needed!)

This birthday bag was designed by Tiffani and we had a ton of fun with all of the glitter and the cupcakes. I love the blue and brown colors and the glitter, of course. Yaay! Tiffani also even found the perfect tissue paper for the insides of all of her bags. I think that most of the supplies that we got for all of these bags came from Big Lots and from Wal Mart - Big Lots has especially good deals on plain gift bags in lots of different colors and sizes and you can get them in packages for a very inexpensive price.


This bag is great for a girlie birthday - loving the birthday fairy and all of the bling. This one is also by Tiffani. I think that she went totally nuts with the Paper Doll Cricut cartridge . . .

. . . she also made one for the super men (and boys) in our lives as well because . . . well. . . they just probably wouldn't dig all of the pink glitter on the fairy bag. Then again, you never know.


Too cute this little super man is, with the silver foil city in the background!!!


Deb Egan brought this bag and tag and Tiffani and I are just going nuts over the paper that she chose. She also cut out that little star embelishment thing using glitter paper and we stuck it on the bag with a sugar coated brad. Love the colors for this one and it could be for Christmas OR a winter birthday. . . perfect!


Here is a bag for Halloween goodies. I didn't make a tag to match, I wish I had been that smart. But I DID make a Halloween card because I just couldn't stand it, and we put those together too. Yes- next month will be all Halloween stuff, but I JUST COULDN'T HELP IT. . . HALLOWEEN IS MY FAVORITE HOLIDAY EVER THERE CAN NEVER BE ENOUGH HALLOWEEN!!!


Scary, huh? I know. :)


Finally, here is a bag and tag of sorts, although not a gift bag. This little "bag" is more of a holder for a ziplock baggie. Now you can put cookies or candy or cocoa mix or whatever you want in the baggie, and the baggie goes inside THIS. See? Then the treats show through the little window. All done in my favorite Christmas paper from last year too. . . and that is the end of the Card Day goodies for now. :)


What a great day! Thank you all, it was really a treat!

Wednesday, September 16, 2009

Operation Write Home!

Operation Write Home posted this video tonight. . . and although I have seen this one in the past, it was a very influental reminder of things that are important to me right now.

I can't really do much as an individual to change health care, or prevent global disaster. My car isn't very "green." I don't have much to say about the whole MTV video music awards or time to worry about Brangelina's thirteen kids. . . but I can make a difference in the life of a few strangers, and that is what I would like to do.

To make a point about how very easy it is to get involved with something like Operation Write Home, I am displaying my newest goal. I bought a box of these "My Mind's Eye" blank greeting cards at the Hobby Lobby when I was visiting my grandfolks last spring. They were on clearance. All of the other materials shown here, came from the dollar store, or other various scrapbook sales where things were very, very cheap. I am going to make fifty cards for OWH with supplies and scraps that I already have on hand. I was suprised at how easy it was to whip these ones out. And for pennies! You don't have to spend a lot of money to donate hand made cards. It doesn't take a lot of time or effort. Best of all when I get done and sit back and see what I have done, I just feel really really good. *sigh*

If anyone is interested in joining me in this goal, I am more than glad to share my supplies, space and time, in fact, I spend most of all day Mondays doing laundry and making cards after AJ goes to school. I won't make you help me fold socks. :) But I will share my glue! Email me or leave me a message and you can come join me if you like. I hope to have this box of 50 ready to mail out some time in the next couple of weeks.

Scrap mania over for today. Good night!

Tuesday, September 15, 2009

Wedding Invitations


Filling a request for my buddy Stephanie (It's been way too long, sister!!!) Here is a quick tutorial for Wedding invitations that are fast, easy and fairly inexpensive. They can be mass produced for quick assembly and mailing too!

Cut a piece of cardstock in the size of the announcement that you desire. It should be slightly smaller than the envelopes you want to mail with!

You will also need a piece of patterned paper - Die Cuts With A View makes a great little wedding stack in the 4.5 x 7" size that has a great selection of wedding themed papers in some really cute colors, but there are tons of options out there! You will also need some vellum paper. For this example, I printed the announcement on the vellum in a blue ink to match the blue cardstock paper. I layered the vellum on the patterned paper and rounded all of the corners with a corner punch. You could also use any of those other decorative edge corner punches - there are tons of them out there now! All three pieces of paper are held together by the two eyelets at the top. The final step is to add a coordinating ribbon - you could put a bow on the front if you like. I put my bow on the back. :) I also added a little ring charm. You can get wedding themed charms at any of the craft stores in the scrapbooking section.

There are tons of other great variations of this style - you could also add a silk flower in your wedding colors - or even make this design into the "front" of a card and include an engagement photo - or, you could print engagement photos onto white paper and use the photo in place of the patterned paper as shown here.

Good luck and happy crafting!

Monday, September 14, 2009

More Scrappy Tips!

Ahh, another opportunity for my friends to learn from my accidents!

So I have been totally into the whole digital stamp thing for a few weeks now. I must admit that it took a while to get the hang of it. I learned a few things along the way, so here are a few tips!

Have you collected any digital stamps yet? I will head you in a great direction. Check out Dustin Pike's blog and be sure to stop in at Hambo Stamps too. Once you have a little collection of stamps, here is what you do next.

Decide what size you want your image to be. The cool thing about digital stamps is, you can make them any size you want. Open your image editing software, and make a new project. For instance, I made a 3.5inch by 5 inch window. I selected the whole window and copied the stamp that I wanted. I then copied it into the 3.5 inch window by selecting "paste into selection." (These steps can be modified, according to
however you want to resize your stamp. I realize that all graphic programs are different. I use Paint Shop Pro, so that's how I did mine!)

The next steps I learned through trial and error... mostly error! :)

When you print your stamp, use something heavier than your usual copy paper. This is impoartant especially if you are going to use watercolors to color your stamp. If that is your medium, printing on watercolor paper works best! I printed this stamp on a piece of white cardstock. The cardstock has a little bit of texture to it, which is ok. Next time I might try using one with a smooth surface. Try both!

When chosing your print options, print with the highest quality and dpi available. It takes longer, but the results are worth it. Print several copies on the same piece of paper if you can, this will give you lots to work with!

Coloring the stamp - I tried lots of different mediums. First, I colored with markers. The markers were very bold, but left that . . . marker-colored look, if you know what I mean. Lots of little lines. And shading was difficult. Maybe if you have better markers, it works great. I have cheapo markers. :)

Next I tried using water color pencils, but honestly I need more practice with these. I ended up smudging a lot, and my printer ink ran. . . Not so fun. Next. . . I made a trip to WalMart and bought a shiny new package of Rose Art colored pencils. Awesome! Great for a low-budget project, which is the state that I am in at the moment.

Digi stamp colored, the final step was to cut it out, add a few mats and a little bling. I added some bling with my glitter gel pen. (I need an intervention, have been addicted to the Clear Star glitter gel pen lately. What am I going to do when it runs out?) I added a few glitter brads and finally I mounted the stamp on a card base. Oh! Cute! Did I mention that I love dragons????

Now then, those are the tips that I have for getting started with digital stamps. I'm sure that there are lots of other ways to get the job done but this is what worked for me. . . and here is the result. . . thanks Dustin for your tips! Be sure to stop by his site - he has an awesome deal on five pages of digital stamps that are a great deal. It would give anybody enough to work with for a very long time!

Sunday, September 13, 2009

Peanut Butter! And Jelly!!!!!

Once in a while, when I am putting cards or pages or whatnot together, I run into two products that really really go together well. When this happens, it's like magic! It's like peanut butter! And jelly! Chips and salsa! Fish and chip. . . okay. . . you get the idea! The last time that I had this happen was when the Rock Star pack came out by Die Cuts With a View, and I got my "Indie Art" Cricut cartridge. Those are two things that absolutely go together without fail!

So today Rich, Josh and I made a trip to the craft store. . . wierd. . . I usually have to go to the craft store alone. Not that this bothers me, mind you. :) Josh found some drawing paper. Richard found some halloween gargoyles that are just cute. . . he collects gargoyles so he was really excited, I think, to find something that HE liked in the craft store. Haha.

Anyway. There was a great deal on the new Cricut cartridges and so I picked up "Winter Woodland" which is going to be a great great thing for making holiday cards and such. It wasn't until I got home that I realized just how many awesome things are on this cartridge, and how well they go with the "Polar Expressions" collection by Imaginisce! Imaginisce has been a favorite brand of mine for the last year or so - they always seem to come out with the cutest darned patterns and coordinating stamps and embellies to go along with. Just sitting here looking at this new cartridge and the Polar Expressions stuff has just about put me into a scrap coma. So many possibilities!! I can't wait to get started! So start I did. . . and here is what came out. :)

To make this card I cut two 4.5 inch circles out of both the patterned paper and some white cardstock. I layered them so that the white cardstock is on the inside of the card. I cut the striped circle a little more than in half and used both sides. Those cute hats are on the other side of the striped paper!!! Wee!!! I cut a white strip out of a scrap of the white cardstock and punched the edge to make the scalloped ribbon. Finally I cut the "Let it Snow" sentiment out using a red patterned paper from Imaginisce, and some white and blue cardstock. To finish it all off I used a "Clear Star" gel pen to outline the letters and add a little bling to the ribbon. I used a scrap of silver paper to make the ornament top, cut a hole through it with a circle punch and added the ribbon. Click for a closeup if you like. :) You really have to see the glitter in the Imaginisce paper and the gel pen details to see what a neat sparkle they add. There you go! Super easy, fun and this is just the beginning of my adventures with these products. I'll be back with more soon.


Looking for that cute Polar Expressions paper? Check Scrapbook.com, that's where I ordered mine. :)

Operation Write Home!


An exciting tidbit. . . Cards For Heroes is celebrating their birthday. . . and a name change too! I am super excited to stand behind the new project, Operation Write Home! I invite everyone to check out this site and their mission. It's such a neat thing to be involved in. I am super chuffed to be one of their newest supporters! My box of cards for "Any Hero"es and 25 some-odd blank cards went in the mail last week. It's exciting to think that they will some day make it half way around the world, and back again. I hope that each of these cards will end up in the hands of a stranger and in some way make their lives feel just a little bit better.

And now it is time to get cracking on my scrap space. So much to do. . . Today I am starting to file my inventory for the Craft Fair in November. . . and will also work on finishing up a few odds and ends that I have been putting off. . .

So Happy Birthday Cards For Heroes. . . who is now OPERATION WRITE HOME. . . the deadlines for holiday cards have been posted. . . We have until Sept. 20 to send off Halloween Cards, Thanksgiving Cards are due by October 5, and all Christmas and Hannukkah cards have to be in by November 1! I am going to try like crazy to get one more box done for the holidays. :)

Thursday, September 10, 2009

September Goodness!

September??? How can it be September already? It seems crazy to me. The summer went so fast! The kiddos are back to school... the days are getting shorter... I was just starting to get a little sad about this. And then I got an awesome invitation from Kim at Express the Moment to lend a hand with designing cards for the September Expressions kits! How awesome is that!!! The card kits for this month have some really bold pretty colors with blacks, yellows, blues and pinks. I was grateful for that. Although the chill is in the air, I gotta admit I was not quite ready for autumn colors yet. Let's just call it denial!!!

The great things in this months' kit made it super easy to come up with a few original designs. There are some really cute patterns and embelishments and these wild little chip board buttons that are just adorable! And letter stickers! Oh how cute these letter stickers are!! Here are a few goodies that I made from the kit. . . first, I went kind of crazy with the little owl embelishments in the card. They are way too cute to resist.


The whole owl thing got me on a bird kick. Did you see all of the cute bird things in this pack? Oh my gosh. This card reminds me of one of those uh, social networking sites or something. I'm pretty sure that the resemblence is quite coincidental. :)


Next, an easy layout using lots of mats and a bunch of the coordinating patterns and colors. I love them all so much, it was hard to decide which to use first. And that little chipboard heart is just toooooo danged cute not to showcase.


Another with the adorable papers and colorful embelishments from this months' kit. This card is all about "Just be you!" Which I think is a super cute embelishment for someone fun. I know exactly where this card is going. :)


Another combination of the cute patterned papers available in this months' kits. The kit also has several chipboard WINGS that can be used to make butterflies, angels, or well. . . anything! I love them. I also got a little crazy with the green stickles. . . stickles not included in the kit, but the embelishments in the kit are so cute and glittery. . . it was too hard not to take the glitter and run with it!!! :)


And finally, a favorite. I used almost every single patterned paper in the kit on this one card. It's got tons of layers and isn't it colorful and fun?? I matted all of the papers on black, and wow did that make the colors stand out!!! I love it! Awesome kit, Kim! And thanks for letting me play! I had a great time. Be sure to stop at the ETM site for this months' kit and other coordinating embelishments that match too... I highly reccomend the clear stamp set, it goes with this kit and so much more! There is also a mini album to match... what a fun project for a gift for someone special.

Thursday, September 3, 2009

Video!

I finally made it to Hollywood! Ok not really, but I did make a video.

I have been admiring a lot of those tri-fold or shutter cards that are all over the place.At first I was intimidated by the layouts and the instructions and the patterns. . . well making those cards is a lot easier than it looks! I have been able to crank out a couple of them every day. And now by popular demand, I have made a how-to video for some friends.

Check it out, it's a lot easier than you think and those tri-fold cards come out looking really neat. Happy folding!