
Monday, January 28, 2013
ETM January Kit
Well yes, I know that January is almost over. :) It's a perfectly cold, windy snowed-in day to work on some Express The Moment projects. I'm so excited!
But first, here is a view out of the back kitchen window. I love how the snow is "layered" like some kind of sedimentary rock. You can see where it snowed and stopped, drifted, snowed and stopped and snowed some more. :) The snow isn't really piled quite that high. This pile is on top of the garbage cans that sit under our windows. You can't really see the garbage cans today. LOL.

On with the kit! I followed a ton of January sketches from Stars & Stamps. I love the cute little papers and embellishments for January. They make some pretty darned adorable wintery cards. I don't know about you, but I'm ready to move on to spring. :)


What a great opportunity to use embossing folders, right?


This month's papers are from a whole bunch of different designers like Authentique, Carta Bella, Echo Park and We R Memory Keepers to name a few. Once again Kim has a sharp eye for coordination and there are a lot of fun "go together" things for this month.

This will be a fun thing... it's a game of sorts... 52 Questions on slips of paper that you put in a jar. You answer one question each week and, maybe, you could scrapbook about it or just talk about it over dinner with the family. I used up a bunch of cute stickers and papers from the kit but the little paint can was my own. You could decorate any jar, can or box for this project and it would be really cute. The May Arts ribbon also came out of my stash, and the little bit of lace. I do love decorating jars and cans. :)

We are continuing to make 8 x 8 albums this year just for something fun. You know, if you ever get stuck trying to make a square shaped scrapbooking page, it's super easy to just follow a card sketch or any of the square shaped sketches over at The Deconstructed Sketch. I love them.

If you buy the January kit, you will also get an entire pack of We R Memory Keeper photo sleeve pages to work on your Project Life style album. I love that the pages come in a variety of orientations and sizes so that you can store photos that are horizontal, vertical or even big ones like 6 x 8" sizes. If you're new to this style of scrapbooking it is fun... photos will go where the plain white pockets are and all you have to do is fill the rest with little embellished cards or journaling. The kit has SEVERAL pre-made, perfectly sized journaling cards to pick from to help you along the way.


Did you ever make one of those page titles in this style? It's kind of like a ransom note where you add lots of different words using up letters and stickers to make a complete title. There are tons of things in this month's kit that you can use to make this look. It fills up the 6 x 12 slot on one of the photo sleeves, and it makes a pretty darned cute title, I think. I'm ready to add my photos to the other empty slots in my pages, so maybe I should take advantage of this pretty winter day and go outside and take some. :) Then again, a blanket and movie sound pretty good too!

Thank you for stopping by... I see that lots of areas of the country are being hit by these kinds of storms, so hang in there and stay warm and safe. Stay home and scrap... it's a lot better for you!!
Friday, January 25, 2013
For The Shire!
Last night, I had one of those lying there awake, making a card in your head kind of moments. Ok, it was a long moment. I couldn't sleep!! I'm also in love with The Hobbit movie. I grew up on that book and it's always been a favorite. I'm also a huge LOtR geek. Heehee. So I guess I've kind of been trying to figure this card out for a while. I think I finally came up with all the pieces!


(Adding this to my S&S homework as "earth tone" colors because really, does it get any more earthy than a hobbit hole?)
Here's How:
Card base - 4.25 x 5.5" - White
Dark Green Cardstock Mat - cut this one just 1/16 smaller
(Don't adhere to card at first!)
White - 4 x 5.25"
I sponged some blue sky onto the white cardstock, but not a lot of it ended up showing, so it didn't really matter.
Brown cardstock - I cut one 4 x 5.25" and then just kind of cut a rolling hill pattern along the top edge.
From the same brown CS, I cut a circle measuring 3" and distressed the edges with Chocolate ink.
From some kraft paper I cut a circle measuring 2.75"
This was run through my Cuttlebug with a wood pattern embossing folder for the door. I distressed this piece with a little bit of chocolate ink too.
I adhered the "door" pieces to the bottom edge of the card with the bottom edge hanging off a little bit and trimmed it away.

The little doorknob is an old brad. I searched my stash for a cute antiquey button or something, but this was the best that I found. The brad goes through the door layer and through the green cardstock base. After this, I was ready to attach the green cardstock base to the folded card base. The window is a 1 1/4 circle punch. I punched a cream cardstock (maybe blue would have been better?) I just doodled a little bit of "window" onto it with a brown marker and a white gel pen.

The little fence was cut from the Cricut Cartridge called Paper Doll Dress Up.
I cut two fences at 1.5" using the "real size" feature. The entire fence piece was used on the left side, but I cut it down a little for the fence on the right.
The fence is popped up with dimensional tape.

I kind of have a ton of free fonts. This one is called "hobbiton" and I just printed it out using Word and 16pt font onto white cardstock. I cut it out and rounded the corners a little and cut a little banner shape. The center part is popped up with dimensional tape.

The "grass" for the top of the hill is actually hair, cut from the same paper doll cartridge. I cut it from the cave man and pirate boy shapes at a few different "real dial" sizes from 1 to 1.5" and just kind of overlapped them along the top of the hill.

This is the punch that I used to do the flowers and vines. It's by EK I believe. I punched dark green and white paper and used the dark green for the vines. Gluing the ends down and weaving them through the little fence pieces was tedious but fun. I also used the green flower parts as leaves behind the white flowers. I used my iRock tool to set a tiny pink hot gem to the center of each flower. Whew!
The whole card took me several hours to finish up but most of that was because I kind of had to experiment with all of the sizes and shapes. I love how it turned out and I think I have some more "Hobbitish" ideas in my head too. Yay! Thanks for looking!
Thursday, January 24, 2013
Easter Card for S&S
I love to use this image every year. It's Bunny N Eggs from Dustin Pike. It makes such a cute Easter card. I wanted something very colorful to match the colorful eggs and I think I succeeded with this Imaginisce paper and a whole bunch of different colored bling. :)


Tuesday, January 22, 2013
Boot Camp and things...
I'm soooo excited about Paula's new Design Boot Camp over at Stars & Stamps I just can't stand myself. I feel like I need to go buy some fatigues or at least some olive drab tee-shirts or something. You've GOT to play along with this Monday feature for a while!
This week we learned some basics about color and you know, for a person like me who never really had any formal art or graphic design classes, this was really very handy. I also love the little color wheel link on the Stars & Stamps page. This is definitely something that I will use time and time again, if nothing else, just to find some scraps that "go" together and might make a pretty card.
I did my reading and fiddling with the color wheel. I decided that a triad pattern might be fun for me to try this week. Two of my favorite colors are red and purple and although I love them together, it's hard to put them together in the same project without it looking wonky! I was super happy to see them in a triad pattern with the color green. I decided to give it a try. I used some scraps of grass and scraps of red and purple from another project. I'm not smitten with the sentiment and I might cover it up and redo it with something else. . . don't you hate it when you don't feel like a card is "finished?" I do love the bling, which never shows up well in a photo. This card is very sparkly!

Here is another example of some complementary colors from and old card that I did. I didn't know about complementary colors when I made this card, but I always have liked how this card turned out.

Yay for that cute little Dustin Pike digi!
Today's Tutorial is a fun one by a sweet lady named Jann.
She was so kind to let us use her chalkboard tutorial video today. It really is a great video. I found that I don't have all of the exact same supplies as Jann did but I managed well enough. I love the look of this project and I think that I need to do some more experimenting and stamp searching to find more fun combinations.

I decided to frame my "chalkboard" with a little piece of brown and add some twine and a "nail" (brad) just for something fun.I like it! Maybe I need more colored pencils. :)
Thanks for stopping by and I hope that you'll join me for more Boot Camp fun... what a great learning experience!
Monday, January 21, 2013
iPad Tutorial - Storing Cricut Books
Good morning... I had such nice feedback about last weeks' post for storing PDF files on your iPad. Have you tried it?
This week as promised, I'll share with you how to store your Cricut Books on your iPad. I saw this done in a YouTube video a while ago but the technique has changed a little over time.
I'll tell you a little more about my Cricut use and why I love storing my books on the iPad. I don't own and I never tried a Gypsy. I think I understand that the Gypsy will also store all of the image files and they are searchable. This is nice, but to me a Gypsy would be just another piece of technology to keep track of and charge / take care of. I do like simplicity.
I'm working towards purchasing one of those handy storage things for my Cricut cartridges and keyboard overlays. Once I get that done, I'll be able to get rid of all of the boxes and store them away with the books... won't that be handy? My scrap space storage is limited so this will free up a whole shelf for me to use for something else.
If you're ready, here is how it is done.
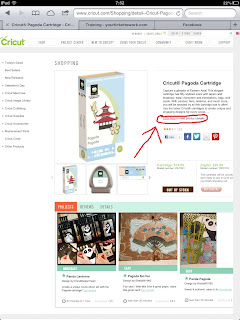
Using your iPad, open up the Safari Browser and visit the Cricut website. (www.cricut.com)
Use the search field or browse around to find the cartridges that you own. Here, I did a search for the "Pagoda" cartridge. Because I love that one. :)
Included in the description of each cartridge is a little line that says "Click here" to read product details:


This week as promised, I'll share with you how to store your Cricut Books on your iPad. I saw this done in a YouTube video a while ago but the technique has changed a little over time.
I'll tell you a little more about my Cricut use and why I love storing my books on the iPad. I don't own and I never tried a Gypsy. I think I understand that the Gypsy will also store all of the image files and they are searchable. This is nice, but to me a Gypsy would be just another piece of technology to keep track of and charge / take care of. I do like simplicity.
I'm working towards purchasing one of those handy storage things for my Cricut cartridges and keyboard overlays. Once I get that done, I'll be able to get rid of all of the boxes and store them away with the books... won't that be handy? My scrap space storage is limited so this will free up a whole shelf for me to use for something else.
If you're ready, here is how it is done.
Using your iPad, open up the Safari Browser and visit the Cricut website. (www.cricut.com)
Use the search field or browse around to find the cartridges that you own. Here, I did a search for the "Pagoda" cartridge. Because I love that one. :)
Included in the description of each cartridge is a little line that says "Click here" to read product details:

You'll notice that the bottom of the screen (Where the little panda photos were, as above...) has now opened a new frame. Included in this frame is a link to the "digital handbook."

When you touch the "digital handbook" link, it automatically opens the PDF file for the book. The whole book! Are you getting the idea now? The rest of the deal is to simply follow the same steps as last weeks' tutorial about storing PDF files.
Go ahead and store as many of the books as you like to your iBooks. When you are finished, you can even create a separate "shelf" for them if you like. I called mine "Cricut" and I am so impressed. My iPad even makes the little books look like tiny spiral bound versions of the real books. I like that I can also download and preview books for cartridges that I don't have yet, or that I know I can borrow from a friend.

To be honest this is a new trick for me. I've had my iPad for almost a year and I didn't know that I could do this. Now that I've got this figured out, conversations with my muse are a lot simpler. Sometimes they go like this:
Me: (Randomly) Whoa, I really need to make a card with a marquee kind of frame and a fancy heart.
Muse: Well, you probably have a Cricut cartridge that will cut both of those for you.
Me: Yeah, I wonder if both of those shapes are on the Storybook cartridge?
Muse: Ok, let's go dig through aaaaaaaaaalll the boxes and books and take a look...
Me: No need! I've got them all right here... tap tap tap... tappity tap... tap tap... there they are.
Muse: Wow, that was fast and cool... let's go have some more coffee.
Thanks for stopping by for today's tutorial... I'll continue the iPad series again next Monday with another fun tip!
Wednesday, January 16, 2013
Spring!
Maybe it is wishful thinking. The past week or so, we've had a lot of sub-zero temperatures. It's not going to warm up any time soon, and there's been a lot of snow over the last 24 hours or so. Sigh.
What else can you do to warm up, besides think of spring?? Well, I did my best to do that today!
Here's a new video, shot today. My hubby gave me a new video camera for Christmas and I am supposed to be able to record in "HD" now - i'm not sure how well that will work out, but it can't be any worse than the little Flip recorder I have been using since I started these things. :)
It took me quite a while to figure out the process of getting the recordings from the camra to the computer through the editing software to YouTube and all... but I think I finally got it down. Enjoy, and THINK SPRING!!!
Monday, January 14, 2013
iPad Tutorial - storing PDF files
Welcome - I've promised to give a little tutorial about using your iPad for paper crafting and the response was very positive! I'm so glad that there was interest. Today's first lesson is using your iPad to store PDF files. This can be VERY handy. There are tons of things that are available in PDF files that have to do with making cards or scrapbooking layouts. You can find tutorials, sketches, ebooks and loads of other things in PDF format on the internet! For today's lesson, I'll show how I stored several sketches, because these are the things that I use most.
Start by using your iPad to search the internet for PDF files. I'll give you a few handy links. PDF files of Operation Write Home sketches can be found here. You can find PDF files of some of Jen's awesome Deconstructed Sketches here - click on "The Deconstructed Sketch" and then "Sketches 1-40 PDF"

When you have a PDF file open, there should be a grey bar at the top of the page. It says the name of the PDF file, in this case, OWHSketches_1-150.pdf and next to it there is a button that says "Open in iBooks."
If this bar is not present, touch the top of this page and that bar should show up by itself.
Go ahead and touch the "Open in iBooks" button.
Here is what will happen next. The browser will close itself, and iBooks will automatically open. iBooks, if you haven't seen it, looks like this:

I'm pretty sure that most iPads have iBooks already installed. If you don't have it, you can get it from the App Store for free.

Not much different, other than it is now open in the iBooks app, instead of your browser. Notice the little "Library" button at the top left, and a review of all of the pages that can be seen along the bottom. (If this action does not happen INSTANTLY, be patient. I've noticed that it sometimes takes a few seconds to move a whole PDF file from a browser or my email to the iBooks app, especially if the PDF file is very large. I would imagine that this is because it is downloading.)
When you touch the "library" button, you will be returned to a screen that shows you all of the books or files that you have stored in iBooks. No need to "save" your PDF file... your iPad will automatically keep it for you, until you are ready to delete it.


Start by using your iPad to search the internet for PDF files. I'll give you a few handy links. PDF files of Operation Write Home sketches can be found here. You can find PDF files of some of Jen's awesome Deconstructed Sketches here - click on "The Deconstructed Sketch" and then "Sketches 1-40 PDF"
In this photo, I have opened the PDF file for the OWH sketches in my browser:

When you have a PDF file open, there should be a grey bar at the top of the page. It says the name of the PDF file, in this case, OWHSketches_1-150.pdf and next to it there is a button that says "Open in iBooks."
If this bar is not present, touch the top of this page and that bar should show up by itself.
Go ahead and touch the "Open in iBooks" button.
Here is what will happen next. The browser will close itself, and iBooks will automatically open. iBooks, if you haven't seen it, looks like this:

I'm pretty sure that most iPads have iBooks already installed. If you don't have it, you can get it from the App Store for free.
Here is what it will look like after you touch the "Open in iBooks" button:

Not much different, other than it is now open in the iBooks app, instead of your browser. Notice the little "Library" button at the top left, and a review of all of the pages that can be seen along the bottom. (If this action does not happen INSTANTLY, be patient. I've noticed that it sometimes takes a few seconds to move a whole PDF file from a browser or my email to the iBooks app, especially if the PDF file is very large. I would imagine that this is because it is downloading.)
When you touch the "library" button, you will be returned to a screen that shows you all of the books or files that you have stored in iBooks. No need to "save" your PDF file... your iPad will automatically keep it for you, until you are ready to delete it.
Here is what my screen looks like after I touched the "Library" button:

The "cover" of this PDF collection just looks like the first page. Now then, your screen will look different than mine because I have downloaded other things to my iPad. But your collection of sketches should show up on a "shelf" like this too. You can see that I have also downloaded other PDF files for Close To My Heart books and a few other things. Now, to keep things organized!
PDF files are on a different "page" than your downloaded iBooks. If you open your iBooks and don't immediately see your PDF files, don't panic! Just touch the "Collections" button in the top left of the screen.

You will notice that touching "collections" opens a drop-down menu of different categories. By default, there are different pages for Books, Purchased IBooks and PDF's. You can touch "New" and add as many new pages as you like. I have added a new page for "Cricut" books. (I'll do a tutorial for this next week!)
You can add, delete or move your PDF files any time by opening the "shelf" that they are stored on and touching the "Edit" button in the top right of the screen.
To move a PDF file to a different shelf just do this:
Touch "Edit"
Touch the PDF file you wish to move.
Touch the "Move" button in the top left of the screen.
Touch the collection you wish to move the PDF file to or touch the "New" button to create one.
What is the benefit of all of this, anyway? Well, it is awfully convenient for me to not have to print whole PDF files any more and store the paper in some kind of binder. That is a big savings on printer paper and ink. I also love the convenience of having all of these sketches at my fingertips any time that I want. As long as my iPad is with me, I am good to go. :)
Thank you for stopping by and please let me know if you have any questions or comments. Next week I will show you more tips and iPad tricks.
Hugs!
Thursday, January 10, 2013
Feeling Kinda Sketchy
I wanted to play along with a couple of sketches today. So I snagged the latest from Deconstructed Sketches and Stars & Stamps.
I've been playing with a new embossing folder from Provocraft called Honeycomb and a new Friskars stamp set called Beary fun. When did Friskars start making stamp sets? I guess I am behind the times.

I'll add this one to the "no sentiment" challenge over at S&S because... there is no sentiment... :)
Also used : Martha Stewart lace border punch and a Nestability by Spellbinders.

I also used up a few scraps of paper and embellishments by Imaginisce for this one.
These bright cheerful colors are just what I need on this cold wet windy snowy day!
Here is the best news of all for today. If you haven't seen it yet, check out this video that celebrates Operation Write Home's 2,000,000th card. Two Million. That is amazing!
Thank you for stopping by!
Monday, January 7, 2013
More Kid Cards - 10-15
Haaaaaaaapy New Year!
Oh, I sure hope that 2013 is good to all of us! I am so ready for a fresh start. I've got a lot of irons in the fire, so to speak, and I'm thinking that there are lots of good things to come! The end of '12 turned out to be quite unexpectely sad for my poor family. We lost Grandpa Lloyd on New Years' Eve. What a shocker - but he had been very sad and lonsome since he lost his sweetheart Grandma Bonnie in May of last year. The two of them are most likely back to their dancing and shenannigans in some better place! I can definitely tell you that my in-laws are made of some strong stuff. They've had a hard go of things and they are very inspiring to me for their fortitude.
Now then, I've been trying to keep up with my project for 26 kid cards. (You can read back a few posts about this, if you would like.) I've managed to finish a few more and I thought I would share because those kid cards can be hard to create. Maybe something here will spark your imagination too.
Making kid cards was a little bit sad to me because it made me wax nostalgic about the fun things I used to do with Alex when he was tiny and some of the characters and shows he used to love.

I used a lot of character images and I hope that they are still popular enough with kids now that they will be recognized. The little glasses on this Hamtaro cracked me up. I put liquid glass on the lenses and popped them up with dimensional glue so he does look VERY SMART indeed. What a fun card for a hero to send home to a kid with good grades!!

Bob The Builder was always a fun one for me to watch with Alex. He even had to have a hat and little play tool set to wear while watching this show. This seems like a good way to use up small character images like stickers so that they don't look so much like "sneeze." For this card (and the one above, sort of..) I followed some of the latest deconstructed sketches. If you haven't seen some of those, you are missing out.

Toy Story was big when Alex was little. I love the Little Green Men. All I can think of, is them saying, "Coooooooooooool....."
I printed the sentiment using Word and a free font that is called Nasalization, I think.

Ok, this one could be from MY childhood, but Care Bears are still in, right?

I wracked my brain trying to think of things that modern moms and dads might miss doing with their kids. A popular thing, I think, might be playing video games together. I printed these sentiments using Word again. The little "A" and "B" buttons are just 1/2 inch circles with the letters stamped on them. I think that I will add some liquid glass to them to make them look more buttony and plastic! The arcade style paper is from a DCWV stack called Generation Tech. I fussy cut the Tetris blocks (THAT was fun...) and the little controller below.

Maybe today's Moms and Dads don't play Space Invaders but back in MY DAY no Saturday Morning was complete without some sugary cereal, Looney Toons and a bout of ATARI with dad. I still think that these cards would be fun for a parent to send home to their gaming buddies. I can imagine that the thought of Mom or Dad being home soon to play with again would be a good thought for a kiddo, too.
That's it for today, but thank you for stopping by! It is still very very cold here and I hope to enjoy a few more hours of carding time this week. Might as well stay inside and make the most of it!! :)
(Link: If you need some of that liquid glass? You can get some here. I need to order some more, too!)
Subscribe to:
Posts (Atom)